Preventing Zoombombing

Learn how to prevent Zoombombing

Zoombombing is a form of cyber-harassment in which a participant disrupts or interrupts a Zoom meeting, sometimes by sharing pornographic images, hate images or shouting offensive language. As a reminder, do not share your Zoom meeting ID and password on social media. You should place information about your Zoom session in Blackboard (for a course-related session) or email participants directly.

Below are guides to help prevent Zoombombing during your session:

Require a Password to Join a Meeting

This will require all individuals who have access to your Zoom link or Meeting ID to enter a password you provide.

Meetings can require passwords for an added layer of security. Passwords can be set at the individual meeting level for all meetings.

  1. Sign in to the Zoom web portal and navigate to Meetings or click on Zoom within your Blackboard course.
     
  2. Click Schedule a New Meeting or click the topic of the meeting you would like to update the password for.  *Click Edit this Meeting if you are adding a password to an existing meeting.

    Zoom PMI
  3.  Under Schedule Meeting, Security, ensure that the Password and Waiting Room boxes are checked and enter a password (one will automatically be generated).

    Zoom Schedule a Meeting
     
  4. Click Save.
Enable the Zoom Waiting Room Feature

The Waiting Room feature in Zoom allows the meeting host to control when a participant joins the meeting. You can meet with one person while another waits in the waiting room and then allow the person waiting to join the meeting.

  1. As the meeting host, click Manage Participants.Zoom Participants
     
  2. Click More(...) at the bottom of the participants' window and choose Enable Waiting Room to enable or disable the feature. This feature can also be enabled during meeting creation.

    Zoom Enable Waiting Room
Admitting participants during a meeting
  1. As the meeting host, click Manage Participants.
  2. Click Admit to have the participant join the meeting.

    Admit
Admit all participants from the Waiting Room
  1. As the meeting host, click Manage Participants.
  2. Click Admit all.

    Admit All
Sending participants to the Waiting Room during a meeting
  1. As the meeting host, click Manage Participants.
  2. Click More next to the participant's name and choose Put in Waiting Room.

    Zoom Put In Waiting Room
Lock the Zoom Meeting

When you lock your meeting, no additional participants can enter your meeting.

  1. While in meeting session, click Security at the bottom of your Zoom window.
  2. In the pop-up box, select Lock Meeting. When the meeting is locked, no new participants can join, even if they have the meeting ID and password.

    Zoom Lock Meeting
Remove or Manage existing Participants

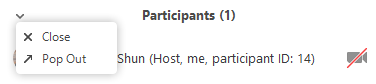
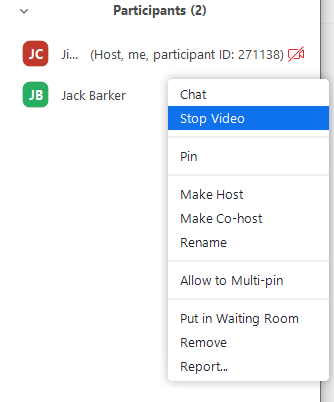
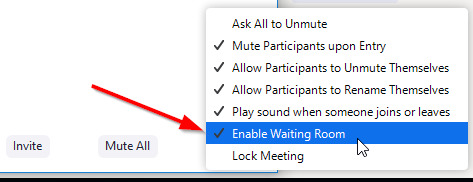
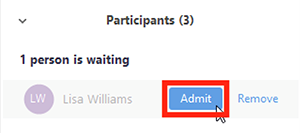
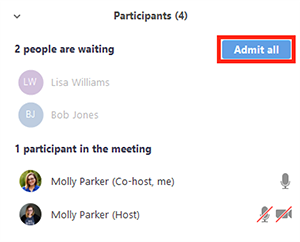
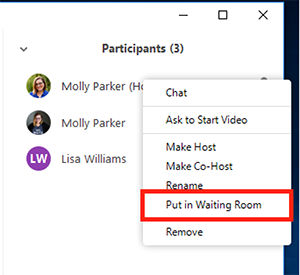
You can remove participants from a meeting and manage what individual participants have access to do during a meeting/class.

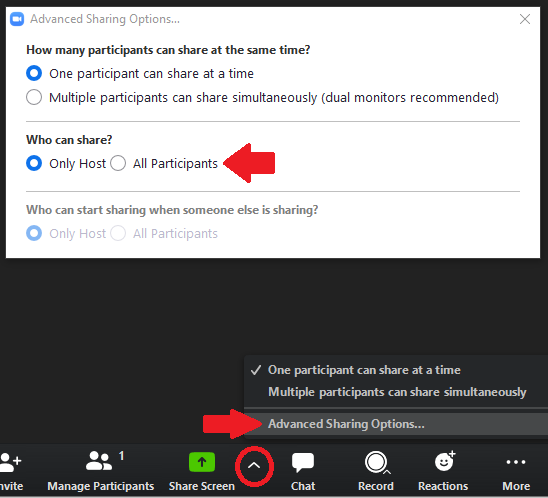
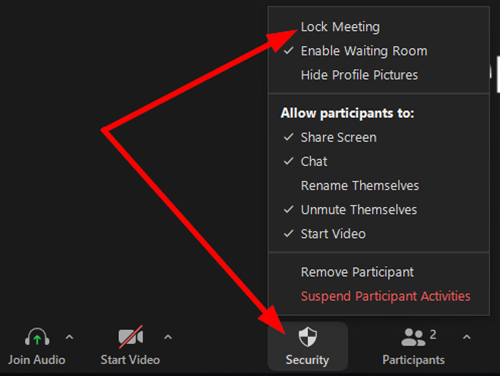
As the host in a meeting, you can manage the participants. By default, any participant in a meeting can share their video, screen and audio.

  1. Click Participants in the host controls to display the participants list:

    Zoom Participants
     
  2. Click the drop-down menu located at the top-left corner to close the participants list or click Pop Out to separate the participants list from the meeting window:

    Zoom Pop Out
     
  3. Hover over a participant and click More for these options:

    Zoom Stop Video
  • Chat: Open the chat window to send messages directly to the panelist.
  • Stop Video: Stop the participant's video stream so they are unable to start their video. If the participant hasn't started their video, you will see the Ask to Start Video option.
  • Make Host (only available to the host): Assign the attendee to be the host. There can only be one host.
  • Make Co-Host (only available to the host): Assign the attendee to be a co-host. You can have an unlimited number of co-hosts.
  • Rename: Change the attendee name that is displayed to other participants. This change only applies to the current meeting.
  • Note: To change your own name that is displayed, hover over your name in the participants list and click Rename. You can permanently change your name in your profile.
  • Allow to Multi-pin: By default, only the host or co-host can utilize the multi-pin feature, but either can allow individual participants to multi-pin on their video layout.
  • Put in Waiting Room: Place the attendee in a virtual waiting room while you prepare for the meeting. The host must enable waiting room for this option to appear.
  • Remove: Dismiss a participant from the meeting. They won't be able to rejoin unless you allow participants and panelists to rejoin.
  • Report: While in a meeting, you can report a participant for inappropriate behavior.  Reported participants are removed from the meeting.
Disable Chat in a Zoom Meeting

You can determine if a group or 1:1 chat is available during your meeting/class.

You can turn off chat for all your meetings and webinars from your Profile Settings, if you do not want to use the chat in your meetings and webinars. This will prevent the host, co-hosts and participants from chatting for any meetings you host. The Chat option will no longer appear in the Meeting Controls.

Or you can disable the Private Chat, which will prevent participants from sending messages to individuals instead of the entire group.

  1. Sign in to the Zoom web portal at https://worwic.zoom.us
  2. Click Settings.
  3. Click In Meeting (Basic) on the right hand side
  4. Click Chat and Private Chat toggles to disable in-meeting chat.

    Zoom Chat Settings
Require Registration for a Meeting

Scheduling a meeting that requires registration will allow you to have your participants register with their e-mail, name, other questions, and custom questions.

  1. Sign in to the Zoom web portal and click Meetings. You will be able to see the list of your scheduled meetings here. You can either schedule a new meeting or edit an existing meeting. Then check the "Registration: Required" box. Click Save.

    Zoom Registration Required
     
  2. You will then want to Edit your meeting. Once you go back in to edit the meeting, the Registration section will appear. In this section, you can customize your registration page with a banner and logo. In the Invite Attendees section, you can find your meeting link and the list of registrants. You can also set the type of registration for the meeting.
     
    1. Manage Attendees

      In this section you can generate a list of registrants for the meeting. Here you can also copy the invitation that was emailed to the registrant. Clicking on the registrant name will provide addition info about that person.
      Zoom Manage Attendees

    2. Registration Options
      In this section you can configure the registration process by changing the approval type, registration questions and some additional registration settings. There are two types of approval:
      1. Automatic Approval: Anyone who signs up will receive information on how to join.
      2. Manual Approval: Anyone who signs up will need to be approved by the host on the meeting management page.

        As the host you can opt in or out for email notifications when someone registers. You can also not allow registration after the scheduled meeting time has passed.

        Zoom Registration Options
Disable Screen Sharing for Participants

Advanced sharing options allow you to control who can screen share. See also: How to Keep Uninvited Guests Out of Your Zoom Event.

In the host controls, click the arrow next to Share Screen and click Advanced Sharing Options.

Under Who can share? choose Only Host.

Close the window.

Zoom Screen Share Options


IMPORTANT
If a Zoombomber enters your meeting or class, learn how to Remove Participants from a Zoom session.